Build Desktop Apps With HTML Using Brackets Shell
 I recently posted on the state of native desktop apps in HTML5 and mentioned that at my company we chose to use Brackets-Shell as our native app solution. I want to go more in-depth into what brackets is and why we chose it as our solution. This will be the first of a series of posts dedicated to brackets-shell and customizing it for your native HTML desktop applications.
UPDATE: I Posted part 2 of the series: JavaScript and the Brackets Shell Environment
What is Brackets?
Brackets is an open-source code editor created by Adobe. What makes brackets so cool, though, is that the entire editor is written in HTML and JavaScript. This puts Brackets in a unique opportunity that allows pretty much any developer that would use the editor (HTML and JavaScript guys) to add to and improve the editor with the very languages they use on a regular basis. And while I don’t use brackets myself just yet (hard to leave Sublime Text) it is definitely on my radar and I may make that switch soon.
What is Brackets Shell?
Brackets Shell is what allows Brackets to be run as a desktop application. It takes Chromium Embedded Framework (CEF) and adds some extras along with an excellent build tool. The brackets-shell app is so well done, it made it easy for a web-developer like me to get my first ever C++ pull request accepted (I took credit for that whole pull request, but the windows portion was done by my good friend, Jordan).
Why Use Brackets Shell Instead of Other Solutions?
I’m glad you asked:
- Very active development – Of all the HTML shells for the desktop, this one was the most active in terms of code being committed.
- Backed by Adobe – A corporate sponsor doesn’t guarantee that the project will be around forever, but it is more promising than not having one
- NodeJS Integration – The brackets team recently integrated NodeJS into the brackets shell which allows for some really awesome plugin capabilities without learning C++
- The Build Process – Building cross platform desktop applications can be a pain. Unless someone went through all the pain for you and automated the whole thing, including the creation of the installer. And on top of that, did it in Grunt, which most JavaScript developers are already familiar with. But who would do that for you? The Brackets team did. Amazing.
Now on to the good stuff.
Test Your Application in Brackets Shell
The first thing you will want to do is test the shell to see if your HTML application runs in it. The quickest route to doing this is to download the latest Brackets editor and install it. The installer installs the brackets-shell along with the brackets HTML application. If you remove the HTML app then the when you run the brackets shell it will ask you for the location of your index.html file. If you choose your own index.html file from your own application, brackets shell will open that.
To remove the brackets HTML app on Windows, browse to the Brackets folder in your Program Files directory. Inside the Brackets folder there is a folder named ‘www’. Rename or delete that folder, then run Brackets. The file dialog will open prompting you to select your own index.html file.
On OSX, open the terminal and browse to your application directory. Applications in OSX are actually folders, and in terminal you can view their content. CD into the Brackets Sprint [sprint number].app folder and continue to the Contents directory. Inside there you will see the www folder. Delete or rename it and then run brackets. You will see the file dialog prompting you to select your own index.html file.
Building Brackets Shell
If your app runs well in brackets-shell your next step is to setup your computer to build brackets-shell. This is where the shell really shines. They have an amazing Grunt setup that allows you to run the build in one command. Brackets provides some great instructions on setting up your box here. Once you are setup, run `grunt build` from the command line and it should create a full build of brackets shell for you. So awesome.
Setup for Your App
This is where things get fun. Let’s make the shell be a full-on desktop app for our own software. Make sure you have followed the instructions for getting setup to build brackets-shell and then take these next steps:
Fork the Repo – I recommend you fork the bracket-shell repo on github so you have a place to persist your own changes. Once you do that, then check out your forked repo.
Make your app folder a sibling of the shell folder – The build scripts from brackets are setup to expect your HTML app source code to be in a sibling folder to the brackets-shell folder
Use Git for your HTML app – To use the build scripts provided by brackets, you need to be using Git with your source code. If you aren’t using git for your project, cd into your project folder and type `git init` and commit your project to the repo by doing `git add .` and then `git commit -m “Initial commit”`
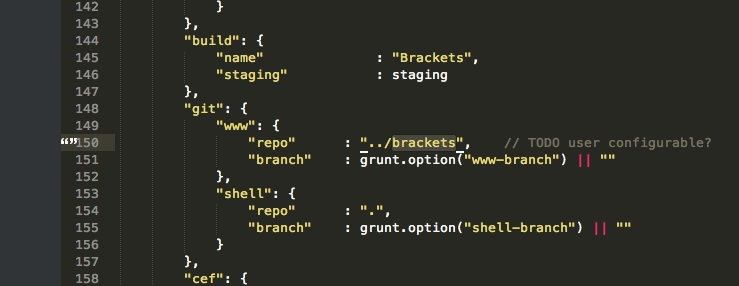
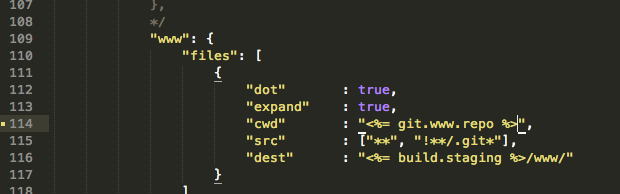
Update grunt file – If your html application folder is called my-app, then you need to tell Grunt where it is. Edit Gruntfile.js in the root of the brackets-shell folder and change the config section git->www->repo from “../brackets” to “../my-app”, and also change www->files->cwd value by removing ‘src’ from the end of the file (assuming your index.html file is in the root of your project) then save the file.
Now you are all setup. To see what grunt commands you have available type in `grunt –help` at your terminal
> grunt --help
Available tasks
          full-build  Alias for "git", "create-project", "build",
                      "build-branch", "build-num", "build-sha", "stage",
                      "package" tasks.
           installer  Alias for "full-build", "build-installer" tasks.
               build  Build shell executable. Run 'grunt full-build' to update
                      repositories, build the shell and package www files.
           build-mac  Build mac shell
           build-win  Build windows shell
                 git  Pull specified repo branch from origin *
        build-branch  Write www repo branch to config property
                      build.build-branch
           build-num  Compute www repo build number and set config property
                      build.build-number
           build-sha  Write www repo SHA to config property build.build-sha
               stage  Stage release files
           stage-mac  Stage mac executable files
           stage-win  Stage win executable files
             package  Package www files
        write-config  Update version data in www config.json payload
     build-installer  Build installer
 build-installer-mac  Build mac installer
 build-installer-win  Build windows installer
          set-sprint  Update occurrences of sprint number for all native
                      installers and binaries
                 cef  Download and setup CEF
           cef-clean  Removes CEF binaries and linked folders
        cef-download  Download CEF, see curl-dir config in Gruntfile.js
         cef-extract  Extract CEF zip
        cef-symlinks  Create symlinks for CEF
                node  Download Node.js binaries and setup dependencies
            node-win  Setup Node.js for Windows
            node-mac  Setup Node.js for Mac OSX and extract
          node-clean  Removes Node.js binaries
      create-project  Create Xcode/VisualStudio project
               setup  Alias for "cef", "node", "create-project" tasks.
              jshint  Validate files with JSHint. *
                copy  Copy files. *
               clean  Clean files and folders. *
                curl  Download files from the internet via grunt. *
            curl-dir  Download collections of files from the internet via
                      grunt. *
             default  Alias for "setup", "build" tasks.
Look at all that goodness! So many Grunt commands at your disposal all ready to go.
The first thing you need to do is run the cef command, which will download Chromium Embedded Framework and prep it for your build. Type `grunt cef` in your terminal and you should see something like this:
$ grunt cef
Running "cef" task

Running "cef-download" task
Downloading http://dev.brackets.io/cef/cef_binary_3.1453.1255_macosx.zip. This may take a while...

Running "curl-dir:cef-mac" (curl-dir) task
Files "downloads/cef_binary_3.1453.1255_macosx.zip" created.

Running "cef-clean" task

Running "cef-extract" task

Running "cef-symlinks" task

Done, without errors.
Now do the same thing for node.js by typeing `grunt node` in the terminal:
$ grunt node
Running "node" task
Downloading node-v0.8.20-darwin-x86.tar.gz. This may take a while...

Running "curl-dir:node-mac" (curl-dir) task
Files "downloads/node-v0.8.20-darwin-x86.tar.gz" created.

Running "node-clean" task

Running "node-mac" task

Done, without errors.
Now you are ready to do a full-build. To do that (yup, you guessed it) type `grunt full-build`. It will take a bit of time, and will end with a warning:
Warning: Unable to read "installer/mac/staging/Brackets.app/Contents/www/config.json" file (Error code: ENOENT). Use --force to continue.
Don’t worry about the warning, if you made it that far you made a full build! You can check out your newly-built app in the brackets-shell/installer/(mac or win, depending on your OS)/staging folder. Run it and make sure it loads your index.html file by default now. (it shouldn’t prompt you to locate an index.html file, it should just open and run the one from your html application)
Let’s customize!
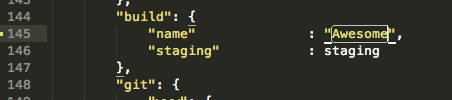
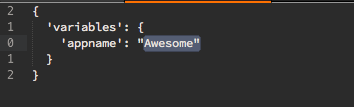
You probably noticed your new application’s name was “brackets” and that your icon for the app was the brackets logo. You don’t want that, so let’s change the name of your app to “Awesome”.
There are a couple of places you will need to change to get your app name changed:
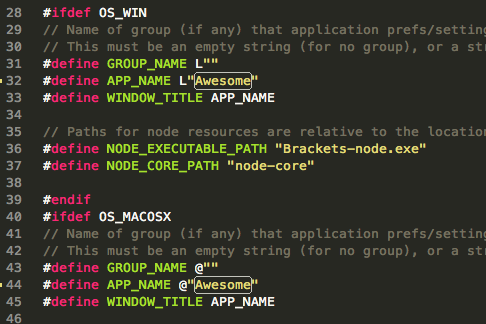
- Gruntfile.js – change the build name
- appshell/config.h – Change the app-name for windows and osx
- appshell_config.gypi – Change the app-name as well
Now just type `grunt full-build` at the terminal and it will create a build with your app and name the app “awesome”
What’s Next?
For basic HTML apps that you just need a shell for, this might be all you need. But this is only the beginning of what you can do with brackets-shell. Over the next few weeks I will be posting new tutorials showing how you can:
- Use built-in JavaScript functions that map to window functions (Drag, Quit, Create popups)
- Map custom JavaScript functions to C++ functions that alter the window in other ways
- Add features like Tray icons in windows, and stay on top of all other windows all the time
- Use node for advanced tasks and call those tasks from JavaScript in the browser window
As always, let me know if you have any comments or questions!